We are thrilled to announce that Chameleon-i has aligned Grids and Baskets, in terms of some of their core features.
This update is live now!
You are now able to:
- Bulk e-mail
- Bulk SMS
- Bulk assign
- Bulk exporting

How you benefit
Flexibility – work the way you want to work
Our views are now completely flexible – whatever you want to do can now be displayed.
Your Custom Views cater for custom fields, and you can order them how you want to in your grid.
If you wish, you can choose to have multiple views, so that when you search you can run a default view, or set a completely different view that displays a different set of data – it’s completely up to you!
Views now have the option to export, which means that you can extract the information into a spreadsheet to use however you please.
Streamline and speed up your work
You now don’t have to create baskets, which means that your work can be streamlined, saving you time.
Customisable Grids can help you make informed decisions about candidates. Work out which candidates are suitable or unsuitable, quickly.
Discover more below:
A brand new feature in the Baskets
Discover our brand new look Baskets:

Expert data based on Custom Views
Within the grids and baskets, you are now able to export data subject to user permission, based on your custom views.
You can create exports quickly and easily based on the custom views you create – essentially the export holds the data set you see in your grid.
Change the view changes the data exported – this is a fantastic option for recruiters who need information fast.
You can export data reports straight from your Custom Views – and create custom data exports to be downloaded into CSV files and spreadsheets.
Our buttons have been updated
We are replacing words with standard icon buttons. This is so that you can become familiar with easy-to-use buttons – users are now provided with consistency throughout both grids and baskets.
Custom Views – a useful reminder of how they work
Custom views are now also available in Baskets as well as Grids. Here is how to create and edit them:
On an individual user basis, you can set the data you want to be displayed in your grids when returning search results using ‘Custom Views’.
Here is how to set your default view:
From the top of the smart navigation panel press the ‘Custom Views’ link:

This will open the panel below:
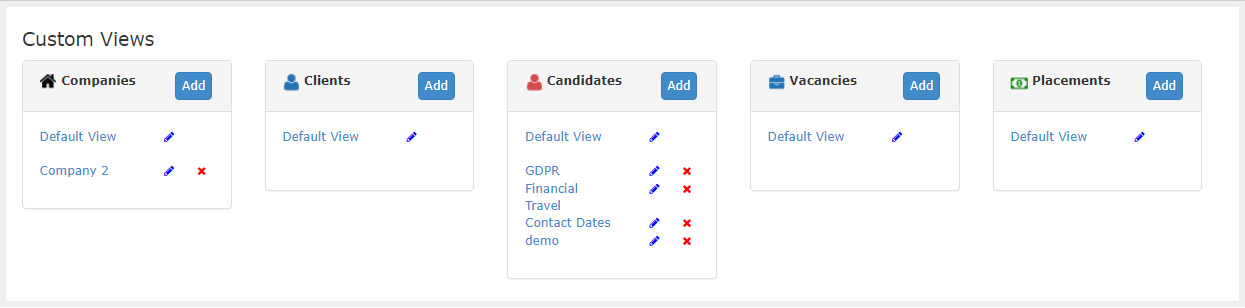
For each record type, there is a ‘Default View’, you can either edit the default view or add additional views by clicking the ‘Add’ button.
Let’s start by editing the Default View.
Click the ‘Pencil‘ icon and the below pop-up will display.
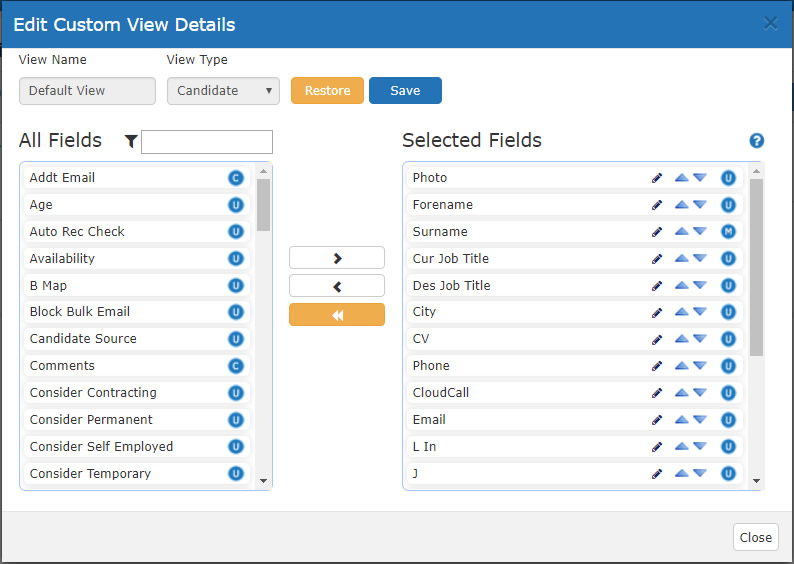
The left-hand panel ‘All Fields‘ shows you the available fields that can be added.
The right-hand panel ‘Selected Fields‘ shows the fields currently selected and assigned to the view.
Use the control ‘Arrow‘ buttons to add or remove fields to or from your default view.
You can order the columns within your grid by moving the fields up or down the Selected Fields panel. This will order them left to right across your grid.
When you have finished editing the default view press the blue ‘Save‘ button.
Click the ‘Close‘ button to close the pop-up.
When you run a search from the selected grid you will see the selected columns returned.
Note if you make a mistake when editing a view or you want to restore the original default view simply click the ‘Restore‘ button and ‘Save‘.
Did you know about the Expander Panel?
Use the expander panel to quickly view candidate information in the grid as detailed below.
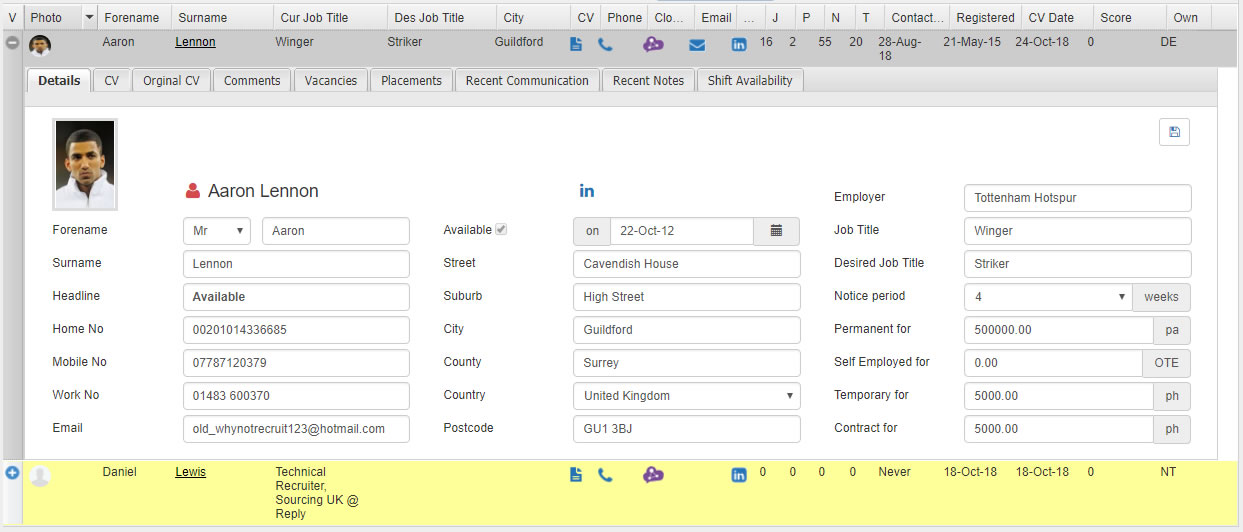
- Selecting the ‘+‘ button next to the left-hand side of the grid displays the quick view panel.
- The tabs each display information relating to the contact record in the panel.
- By default, the plain text CV is displayed, you might notice words highlighted these denote matches based on your search criteria
- RED – Tags
- GREEN – Free text
- To close the quick view, select the ‘–‘ button that is next to the contact name.
Do you know about the Bulk Assign feature in Grids?
The Bulk Assign feature enables you to edit multiple records including record ownership, priority filters and tags.
This is how to use the feature to assign tags:
- Click on or create a basket containing the contacts you wish to bulk assign. Alternatively, open an existing vacancy shortlist.
- Select the ‘Assign‘ button and the following pop-up will display.
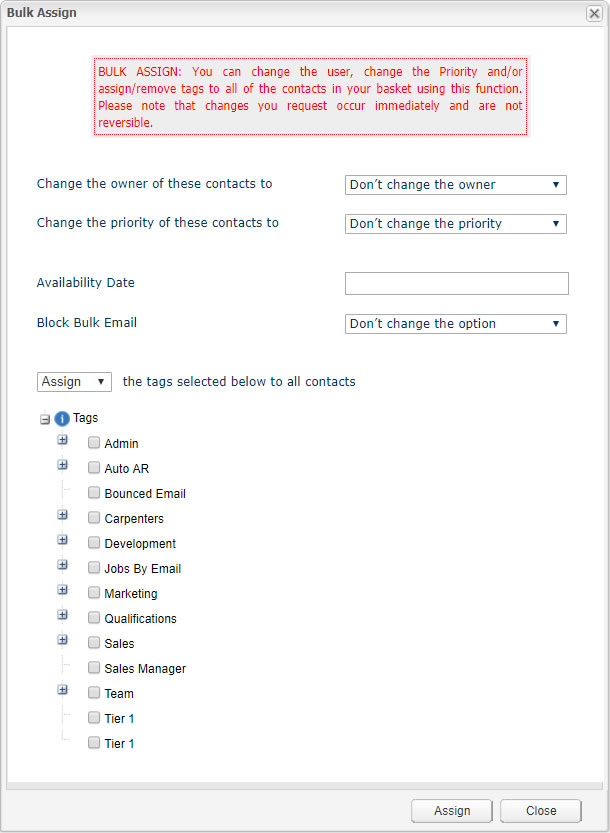
- Select ‘Assign‘ from the drop-down list just above the Tags Tree.
- Select the Tags from the list that you want to bulk assign.
- Press the ‘Assign‘ button. This will open a popup asking you to confirm the action.
- To bulk remove Tags from the contacts in your basket, select ‘Remove‘ from the drop-down box just above the Tags Tree.
- Select the Tags from the list you want to remove.
- Select the ‘Assign’ button. This will open a popup asking you to confirm the action.